|
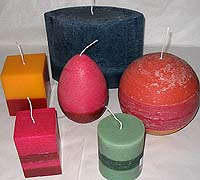
Candlemaking Pictures
|
|
|
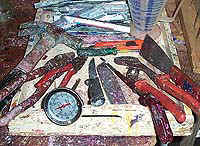
Tools of the trade |
 |
||
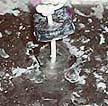
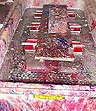
| Wicking candle
moulds The wick of a candle needs to run straight through the centre of the candle to ensure even burning. Candle moulds generally have a hole in the centre of the base through which the wick passes when wicking up. The wick is passed through this hole and then through a rubber seal and a metal washer (pictured). A slip knot is then tied in the wick. Buy pulling the wick tight, pressure is applied to the washer and in turn the rubber which seals the hole in the bottom of the mould and stops wax leaking through the hole. Alternately, you can tape the wick to the bottom of the mould or use a slip knot without a seal. These methods work best where the wax is being poured at lower temperatures and sets relatively quickly. |
 |
||
| The wick is secured by a slip knot at the base of the mould. At the top of the mould the wick is secured on a jiffy wicker in this picture. Alternately a pencil or metal stick can be used provided it is strong enough to hold the wick when it is pulled tight. The wick has to be secured in the centre at the top so that it runs straight down the middle of the candle. It needs to be tight because as the candle sets it contracts and the wick can bend with the contracting wax. You also need to ensure that if the wick has been primed with wax that it is tightened after the wax is poured into the mould. | 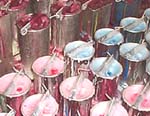 |
||
| Water baths and
securing your moulds In order to achieve a shiny finish on your moulded candles a water bath can be used. Once the wax is poured into the moulds they are weighted by placing a piece of wood with a brick or similar heavy object across the top of them (pictured). This is because once the water is put into the bath the moulds will float and tip over if they are not secured. They can also be secured by placing pieces of brick or other weights on the sides of the bases to stop them floating. The water bath method works best when the wax is poured quiet hot (around 90 degree). The water acts by cooling the outside of the candles quickly so that bubbles and other imperfections don't form in the wax while it is cooling. |
 |
||
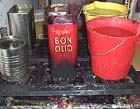
| Heating your waxes Pictured are the gas burners which we use in our workshop to heat up waxes. The recycled olive oil and juice tins contain the waxes which we use for dipping. They are deep enough to dip a standard size household candle. The buckets contain water which the candles are dipped into to set the wax and give it a shiny finish. As can be seen from the picture we heat out waxes directly on the burner and this works well provided that you don't overheat them. |
 |
||
Stacks of Wax Pty Ltd - 239 Australia St Newtown 2042 - Ph 61 2 9557 0306 - Fax 61 2 9557 0804 |
|||